Normally, Usked Partners enables the connection of inbound and outbound request sharing between two separate Usked websites. However, we recognize that you may have a service provider vendor who is not an Usked licensee. This article explains how to create a Non-Usked Partner, for any of your service provider vendors who do not utilize the request transfer process or require mapping of codes.
The most obvious difference that you’ll see will be that anytime after creating a Partner, Usked then reveals a new Partner Provider field to store/receive the name of the service provider assigned by your Partner (i.e., “(Partner) Partner Service Provider Name”) and manages future job statuses accordingly (i.e., remains “to be filled” until the Partner Service Provider name is assigned, even if it’s assigned to a Partner). The “Ignore Conflicting Assignments” flag is also turned on for the Partner, and you will no longer receive alerts of this type (unless the toggle is set to “yes” on the service provider’s profile).
To set up a Non-Usked Partner, first, you’ll need to be sure your “vendor” (i.e., “Smith Interpreting”) is set up as a Service Provider in your site, along with any necessary pay rates.
Second, go to Settings > Usked Partners, “Create a New Partner”.
These are the fields you will need to fill out:
- Name: use name of the vendor (ex: “Smith Interpreting”)
- Direction: select “Outgoing (Non-Usked)” (This means no transfers will occur – and names for the Partner SP field will be filled in either by API or manually fed.)
- Domain name: (leave blank)
- Transfers enabled: leave checked as “no”

Then on the Outgoing Settings Tab – select and assign the vendor “Service Provider”, then click “Save Changes” button:

Once this has been done, you will notice that a Partner Service Provider field appears on requests assigned to the Partner and those field(s) are unassigned.
To take care of these unassigned Partner Service Provider fields, there are two options:
Option 1: In the Usked Partners table, there is a new “transition tool” action icon that looks like a hammer:
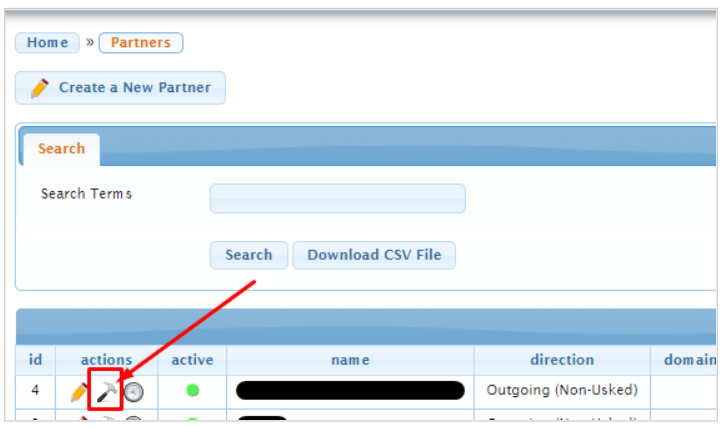
Clicking on this icon will create a Service Provider named “Pre-Usked Partner” and assign that Service Provider as the Partner Service Provider to all slots that are assigned to the Partner, but where the Partner Service Provider is unassigned. Job statuses for requests that are assigned the “Pre-Usked Partner” will then show as “filled”.
You are also now able to use Assignments Report (use search filters to limit results to the Partner) and the Bulk Actions button (https://support.usked.com/bulk-actions) to un-assign or update any Partner Service Provider slots that you do not want assigned to the “Pre-Usked Partner” (i.e., any assignments in the future, post-launch date).

Option 2: Use the new “Create Partner Provider” button that appears next to the Partner Service Provider name field on the service provider slot (for requests on which your Partner is assigned as the Service Provider):

This button allows you to create a new Partner Service Provider just by giving a name. An inactivated user account (as well as an inactive service provider profile) will be created in your site, and the new Partner Service Provider will then be assigned to the slot.
Once added, that Partner Service Provider becomes an “option” (in the dropdown, and only available when this specific Partner is assigned) for future use. Meaning, the more Partner Service Provider names that are created/fed for the Partner, the less you’ll need to use this button over time.