System Settings operate as the control room of your Usked site, housing settings that apply globally to your entire site. These are generally set during onboarding, but can be modified later if desired. #


1. Where are the system settings? #
System Settings are located under the Admin Tab of your home screen.
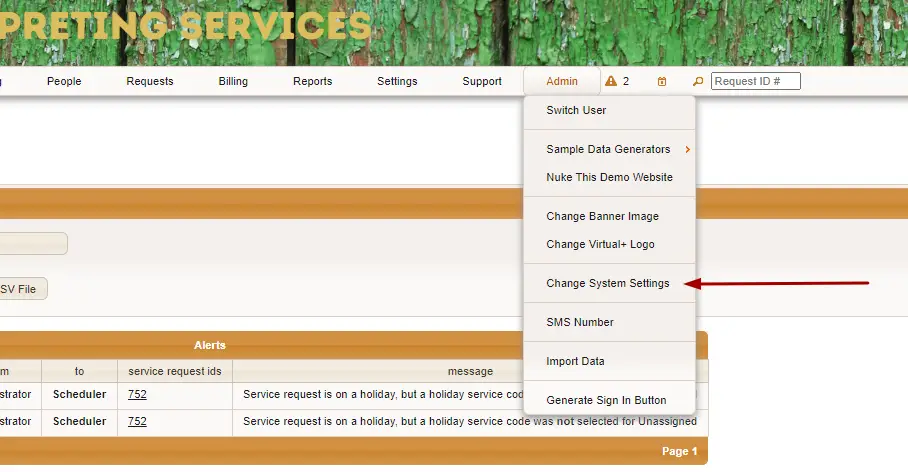
When you get to the settings screen, you will see a number of tabs, starting with General.
2. Who can edit system settings? #
Staff with the Administrator role have the ability to change system settings.
3. Can the system settings be updated at any time? #
Yes! Generally, the system settings are established at the time your Usked onboarding, but that doesn’t mean it’s permanent! You are welcome to change things up at any time. (With consensus from the rest of your team, of course). Have a question about how a setting change may impact your existing set up? Simply submit a support ticket!
GENERAL #
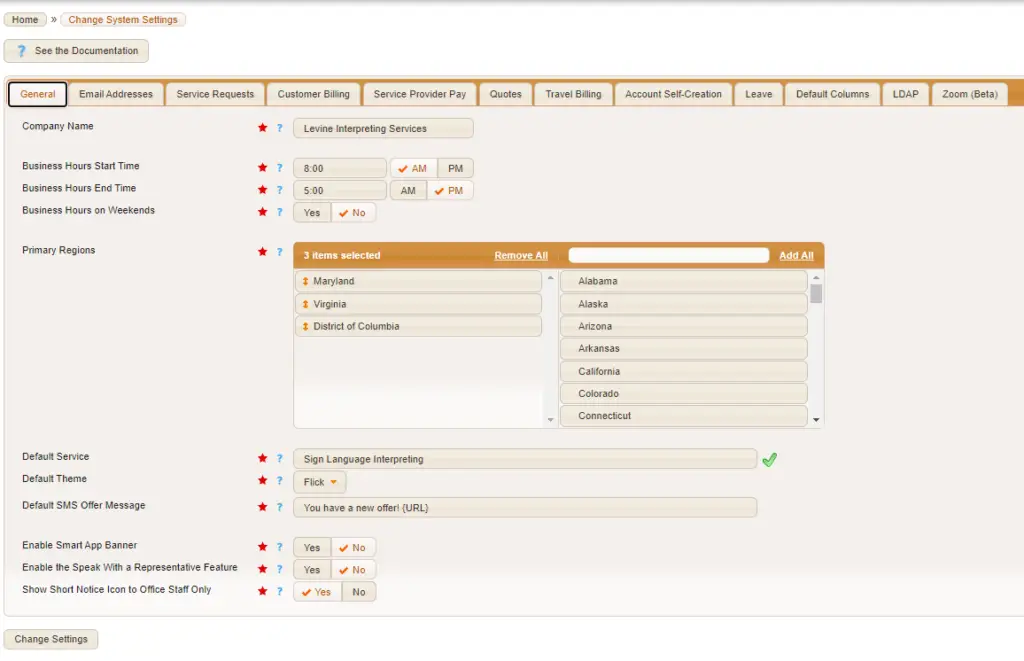
Company Name – The name of your organization! This is shown throughout your Usked site, including the “From” in outgoing email messages and the name shown near the billing address on invoices.
Business Hours – These are the hours your company works and specifically affects when paying/bill rates change from business hours to non-business hour rates. This field is also related to the “Default Cancel Billable Hours” section in our Customer Billing tab. It helps define how long your “business day” is.
Example: If you decide the default for a canceled job is 18 hours, and your business hours start and end times are 8:00 AM – 5:00 PM, then it is also 2 Business Days. For more information about rates, check out our articles for Customer Billing Rates and Service Provider Pay Rates
Business Hours on Weekend – A Yes/No toggle for your business hours if they will be in effect on weekends too. If set to YES, then all seven days of the week will reflect your business hours. If set to NO, the weekend is considered “Non-Business Hours”
Primary Regions – These are the regions you regularly do business in. This is primarily used to determine what is considered an “out of area” request for the 35 day view and certain system notifications.

Example: If you have primary regions set as New York, New Jersey, and Connecticut a request for the Pennsylvania region would be considered “out of area.”
Default Service – The service that is set to default throughout your site. Usually, you’d pick the most popular service you have. This service will be the default for new client slots, as well as the default for the service filter on various reports.
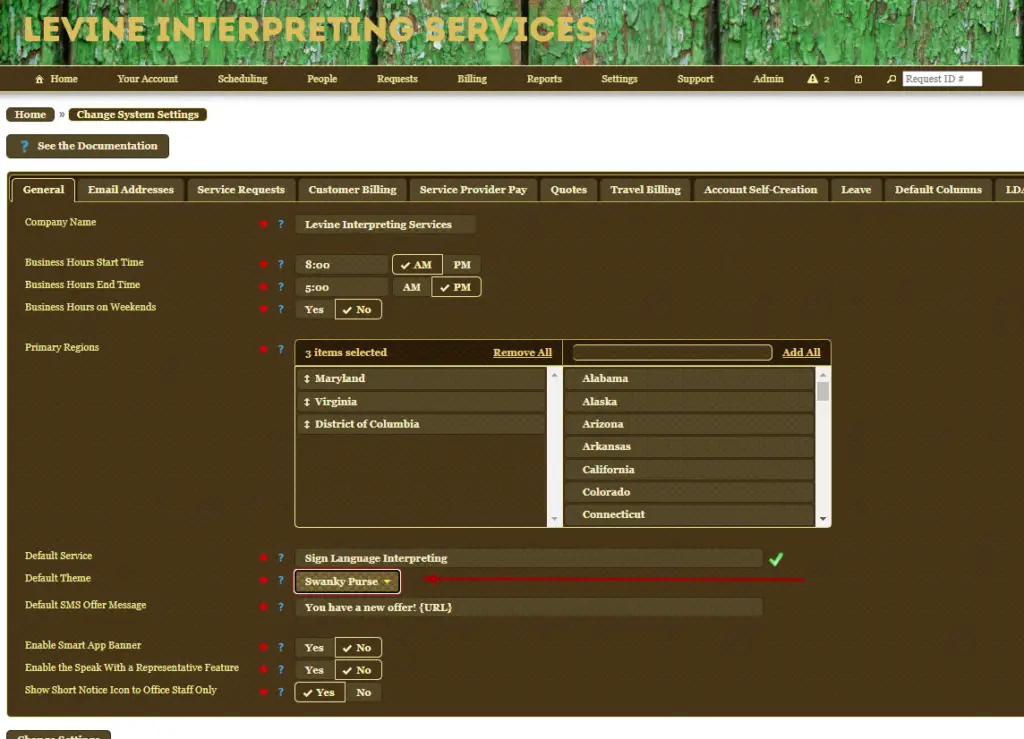
Default Theme – This one is fun! You can set a color theme for your site. It’s common that clients pick a color that works with their brand, but you can also do something different and fun!
Here is what my site looks like with a theme called Humanity:
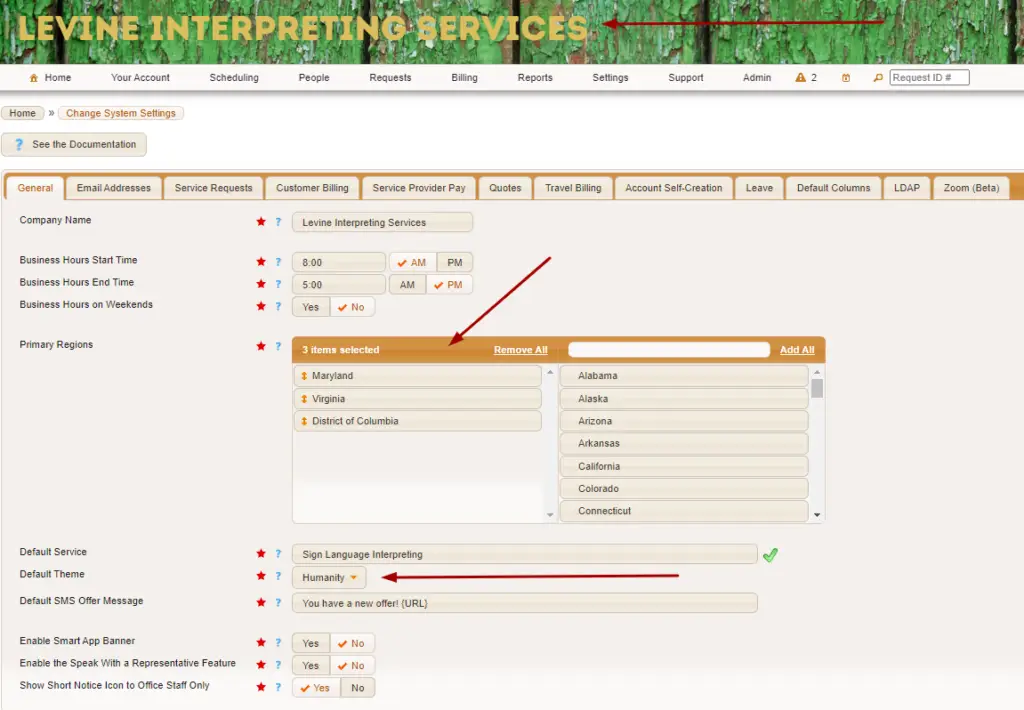
As you can see, the orange bars match the text of my logo.
But what if I wanted my theme to look like a leather purse?! I can do that too.
Default SMS Offer Message – This is the default message used when you are sending offers via SMS. Take a look here for more information about SMS Messaging Capability.
Enable Smart App Banner – This controls whether you want a banner to be displayed when someone accesses Usked from a browser on their mobile device. The banner will encourage them to download the Usked app.
Enable the Speak with a Representative – This controls whether you’d like to enable this feature. This allows your users to get customer support from your company by providing details about their support request and having Usked direct the request to the appropriate person. Think of it as a support robot.

Note: Before you enable this feature, navigate to SETTINGS > SUPPORT TOPICS and create topics for customers to select what they have questions about. You’ll also need to create a “speak with representative” message for at least your primary group.
Support topics examples: Issue with Website, Need help making a request
Show Short Notice Icon to Office Staff Only – This icon of a tiny running person is for short notice requests. If you set the feature to YES, then only staff will see this icon. If set to NO, then everyone, including customers and service providers will get to see this person run! I’m personally looking forward to watching them run next year in the New York Marathon!
The default for Share Personal Contact Information with Clients – This controls whether the Share Personal Contact Information with Clients setting is set to Yes or No when adding new service providers. If this default is set to Yes then the personal email address and phone number of any service provider you add to your site after the setting is updated will be shared with clients that receive services from them.

Note: Service Providers can decide to modify this setting at their own account level based on their preference. To update they would navigate to YOUR ACCOUNT > UPDATE YOUR SERVICE PROVIDER PREFERENCES.
EMAIL ADDRESSES #
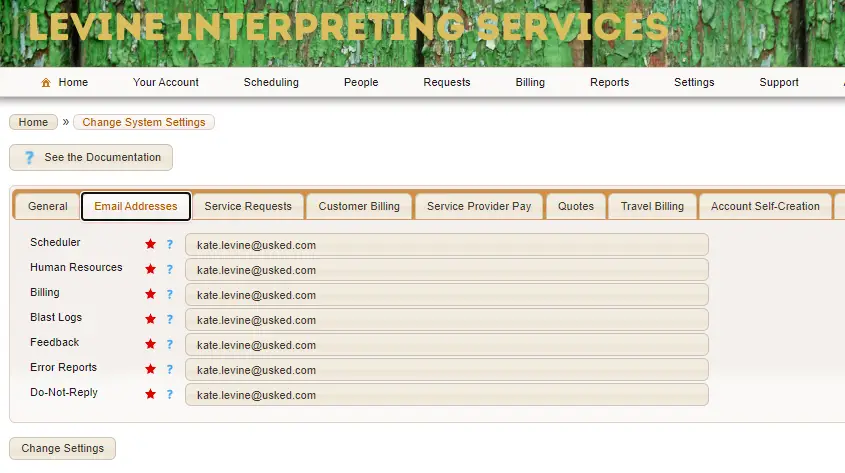
These are the email addresses for various settings. Let’s go through each one!
Scheduler – This is the email address that replies to SMS messages sent out from Usked would go to (related to offers or broadcast messages sent via SMS).
Human Resources – This is the email that gets reminders about pending leave requests.
Billing – This email address will receive emails when a person selects the “send email to billing” option on the Usked app.
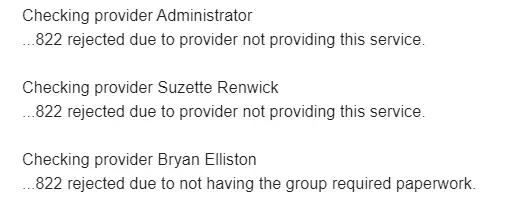
Blast Logs – Whenever a blast is sent, the blast log is sent to this email. It will tell you which service providers are accepted/rejected for the blast based on the availability logic. If they are rejected, the blast will give you a particular reason.
Feedback – This is the email to send feedback to when feedback is provided within the web version of Usked. Clients and service providers can send feedback about any request by clicking on the “give feedback” button on the actions view.
Error Reports – If there are any errors that come up when Usked runs its automatic scripts each day this is the email address those errors will be sent to.
Do-Not-Reply – This is the email address used as the return address for emails automatically sent out by Usked. Usually this would be set to an email address that is not actively monitored, for example, do-not-reply@levine.com.


Note: You can enter multiple email addresses by separating them with commas, for example, kate.levine@usked.com, kate.notlevine@usked.com
SERVICE REQUESTS #
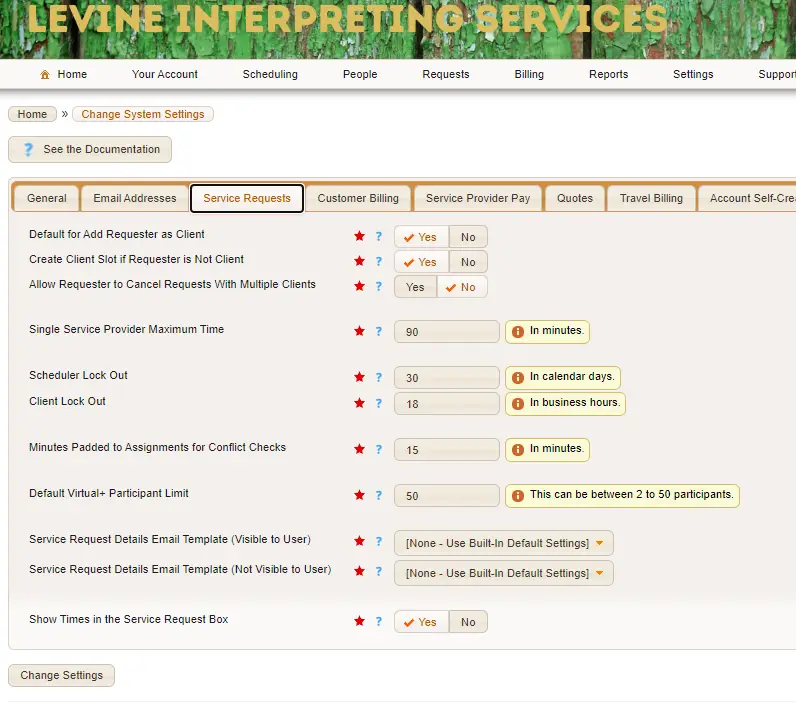
Default for Add Requester as Client – If this toggle has YES selected, then when you create a new service request the requester will also be listed as the client receiving the service.
Create Client Slot if Requester is Not Client – This field is related to the one directly above it. If the Default for Add Request as Client setting (the one above) is set to No this setting will control whether a client slot is created or not. If this setting is set to Yes, then even if the requester is not the client, a client slot will be created for you to fill in the client name and service.
Allow Requester to Cancel Request with Multiple Clients – By default clients can cancel a request they are on, but only if they are the only client on the request. This is due to cancellation affecting all clients on the request. If you prefer requesters have the ability to cancel requests with two or more clients simply set this setting to Yes.
Single Service Provider Maximum Time – This is the maximum number of minutes a service request can be, in order for the system to recommend only one service provider.

Example: If you have a 60 minute meeting, you might need only one service provider, but any longer and you may need two service providers. If you set this setting to 60 then the system will set the “number of service providers wanted” field to 2 when a request is made for longer than 60 minutes.
Scheduler Lock Out – The number of days a scheduler will be able to modify an old service request after the service date.

Example: Jaime’s name was spelled wrong on the service request! If you set the lockout to 3 days, she has three days from the service date to change it before she gets locked out.
Client Lock Out – Similar to scheduler lockout, this is the minimum number of business hours in advance of the start date/time that a client would be able to modify an upcoming request.

Example: The client who spelled Jaime’s name wrong isn’t sure if they need one or two hours for their request. If you set the client lock out to 9, they have up until 9 business hours before the request start date/time to decide what they want to do before they get locked out from making further modifications.
Minutes Padded to Assignments for Conflict Checks – This is the number of minutes to extend the start/end times when performing conflict checks for overlapping service provider and/or client slots.

Example: Jaime has her first job of the day with the client that spelled her name wrong, and wants to go to another job across town that starts 20 minutes later! If allotted 15 minutes of padded time, that will give her enough time to get over to the second job. 5 minutes of padded time would be a little rushed and consider her “double-booked”, therefore unable to make the second job in time.
Default Virtual+ Participant Limit – This setting controls the default maximum number of participants allowed to connect on a Virtual+ request. Some people only want a maximum of 5 people to join, while others will allow over 20 people! This can also be overridden on a per-service request basis in the Location Tab. If you want to learn more about Virtual+, click here!
Service Request Details Email Template (Visible to User) – When a user clicks on the view service request details icon () or moves the mouse cursor over the service request ID number, details of the request are shown. This setting allows you to control exactly which information those that have full access to the request will see. This is only for the “Reveal Component” fields on the selected email template.
Service Request Details Email Template (Not Visible to the User) – This is the same as above, except that this email template is used for those users that do NOT have full privileged access to the service request. These users would be service providers that are viewing service requests that are posted or have been offered to them.

Note: The built-in default is set to NO for every option for users that do not have full privileged access to the service request, except for the following details.
- Service request ID
- Event name
- Organization name
- Service request date
- Location address
- Map link
- Assignment start and end times
- Assigned service
- Dress code
Send Cancel Emails to Service Providers on Contract Days – If set to YES, then Service Providers will receive emails if a job is canceled on a Contract Day.
Send Cancel Email to Staff Service Providers – If set to YES, then Service Providers will receive emails anytime a job they are assigned to is canceled.
CUSTOMER BILLING #
#
Default Cancel Billable Hours – This field is used when a matching customer billing rate cannot be found for a selected billing service code.
Note: If a job is canceled for the group “The Sandwich Shop” but they don’t have a customer billing rate for the service code selected (to grab the cancel billable hours from) then Usked will grab the cancel billable hours from this setting to determine how many business hours ahead of the start date/time the job can be canceled without charge.
Show Group Billing Information in Service Request List View – If this toggled to YES, then group billing information will be visible as a column in the Service Request list. Usually, this is enabled only if Service Providers are to invoice customers directly.
SERVICE PROVIDER PAY #
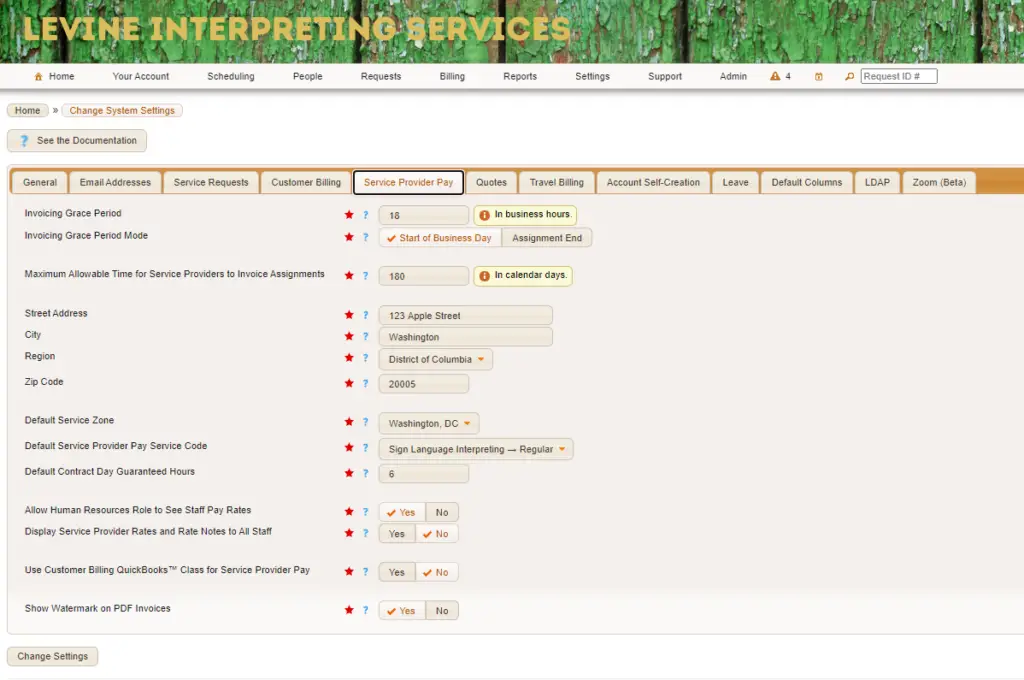
Invoicing Grace Period – This is the number of business hours that a service provider has to wait from the invoicing grace period mode (below) before they are allowed to add the assignment to an invoice.
Invoicing Grace Period Mode – If this is set to Business Day, the grace period is measured from the start of the business day. If set to Assignment End, then the invoicing grace period is measured from the end time of an assignment.

Note: If you’d like service providers to be able to add jobs to their invoice as soon as they have ended set the Invoicing Grace Period to “0” and the Invoicing Grace Period Mode to “Assignment End.” This will allow them to do so on business days. If your business days do not include weekends (from earlier system setting) then they would need to wait until the start of business hours on Monday to add weekend jobs to their invoice.
Maximum Allowable Time for Service Providers to Invoice Assignments – This determines the amount of time a service provider can wait (calculated in days) before adding a billable object to an invoice. This means if the maximum allowable time passes the service provider will no longer be able to bill you for their old job in Usked.
Address Information (Street, City, Region, Zip Code) – This becomes your bill to address on service provider invoices.
Default Service Zone – This will be the default service zone used for the following purposes:
- When a block is set to use the service provider’s home service zone and there is no service provider assigned to the block.
- When a service provider slot is set to use the service provider’s home service zone but there is no service provider assigned to the slot.
- When a new group is created without a parent group.
- It is used as the default value for the service zone filter in various reports.

Note: You are not able to inactivate the default service zone. If you want to inactivate the default service zone, please choose a different service zone to be the new default first.
Default Service Provider Pay Code – This is the service provider pay code used when the system automatically generates staff days. It’s also used as the default value to filter various tools and reports.
Default Contract Day Guaranteed Hours – This is the default for guaranteed hours when a new contract day is created. (Contract Days are located under BILLING > SETTING > CONTRACT DAYS).
Allow Human Resources Roles to See Staff Pay Rates – If set to YES, this allows anyone with a staff role in Human Resources to see and edit pay rates for any staff. When set to NO, only billing staff roles can do this. (Not to be confused with Hamburger or Kaiser Rolls)
Display Service Provider Rates and Rate Notes to All Staff – if set to YES, then any staff member can see rates and rate notes in the window that pops up when hovering over the service provider name or ID. If set to NO, rate information is not displayed there.
Note: If you pay your staff through Usked, you may want to keep this set to NO, as otherwise, everyone will be able to see each other’s rates.
User Customer Billing QuickBooks Class for Service Provider Pay – If toggled to YES, the QuickBooks™ Bill Export feature will export the QuickBooks™ class from the customer billing service code selected for the assignment. If set to NO, the QuickBooks™ class from the service provider pay service code is used instead. Here is more information about exporting to QuickBooks™.


Note: This option works only for billable objects that are blocks or service provider slots. For other billable objects such as leave and contract days, there is no such thing as a customer billing service code, and so for only these billable objects, Usked will fall back to using the service provider pays QuickBooks™ class from the service provider pay service code.
Show Watermark on PDF Invoices – If this is set to YES, a watermark will appear like this with the invoice status:
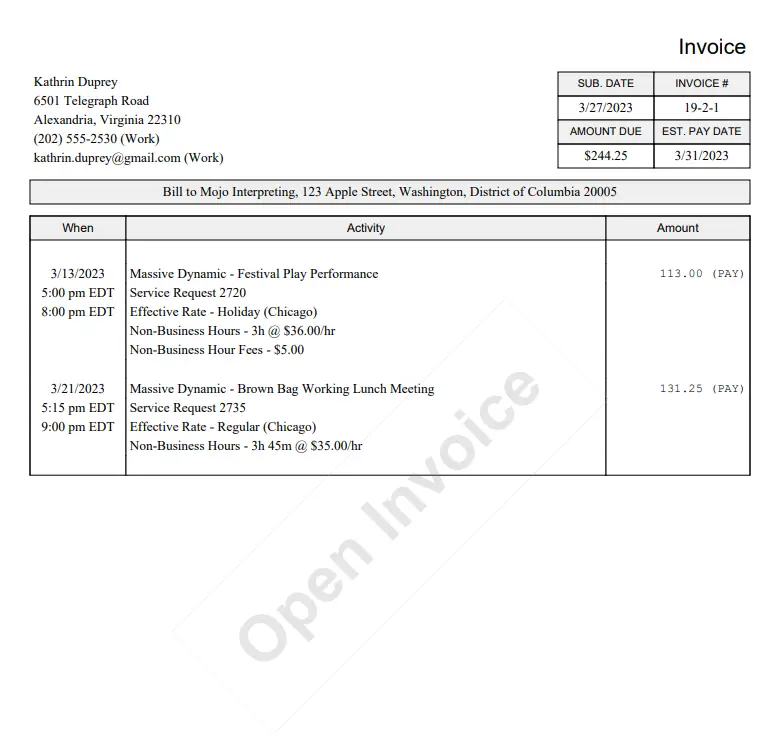
If set to NO, no watermark will appear.
QUOTES #
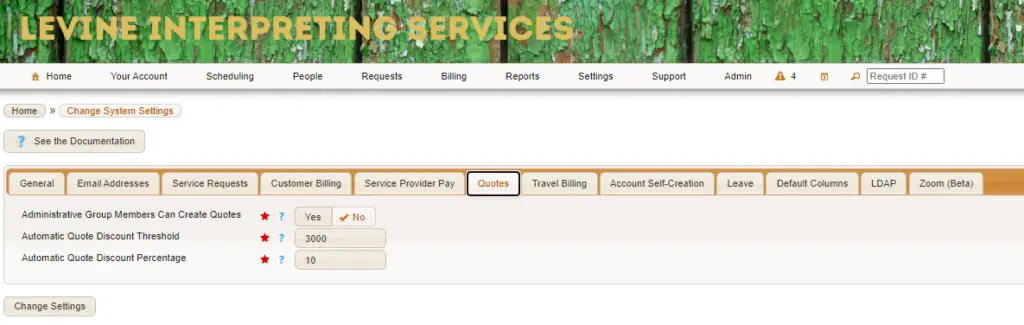
Administrative Group Members can Create Quotes – This setting controls whether or not Administrative Group Members can create quotes for themselves. Schedulers are always able to create quotes for any customer, regardless of setting.
Automatic Quote Discount Threshold – This is a dollar amount that the quote must match or exceed in order to get the discount.
Automatic Quote Discount Percentage – If the quote matches or exceeds the automatic discount threshold above, this percentage of discount is automatically applied to each entry in the quote.

Example: Jaime has requested a job that will be about 400 dollars. If the Automatic Quote Discount Threshold is 400, she gets a discount! If the Automatic Quote Discount Percentage is set for 10% off, Jaime gets 40 dollars off her each entry in her quote. (Not too bad!)
TRAVEL BILLING #

Default Customer Billing Travel Cap – This is the default amount to limit travel expenses for customer billing, which is applied to newly created service provider slots.
Default Service Provider Pay Travel Cap – Similar to above, This is the default amount to limit travel expenses, but for service provider pay rather than customer billing, which is applied to newly created service provider slots.
Freelance Service Providers Can Bill For Travel – This controls whether or not freelance service providers can update for themselves the travel expenses and mileages, to assignments they add to an invoice.
Staff Service Providers Can Bill For Travel – This controls whether or not staff service providers can update for themselves the travel expenses and mileages, to assignments they add to an invoice.

Note: Regardless of these settings, schedulers can always update travel expenses and mileage on any assignment.
Maximum Time to Bill For Travel – This is the maximum number of business hours a service provider can wait before updating for themselves the travel expenses and mileage, on an invoice.
Account Self-Creation #
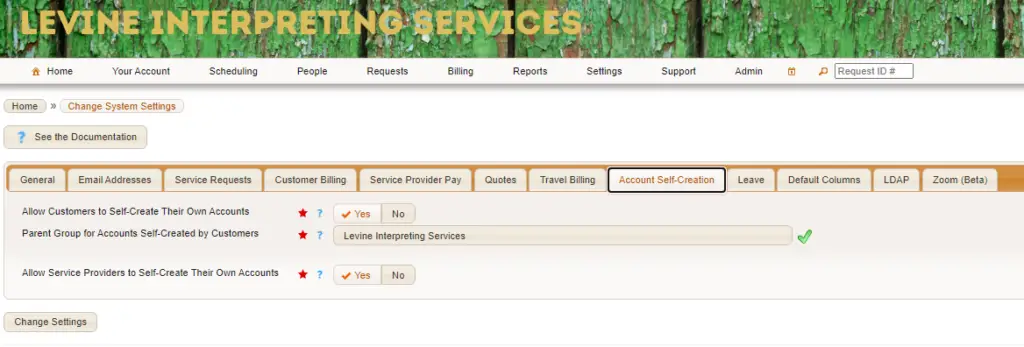
Allow Customers to Self-Create Their Own Accounts – This toggle controls whether or not new customers can create an account by themselves. If this is set to YES, then an existing group must be chosen as the parent under which to add all new self-created groups.
Parent Group for Accounts Self-Created by Customers – This determines what the parent group will be for self-created accounts (explained above).
Allow Service Providers to Self-Create Accounts – This setting controls whether or not Service Providers can create accounts by themselves. Before setting this to YES, make sure to set at least one service to Yes for Show in Account Creation (from BILLING>SETTINGS>SERVICES).
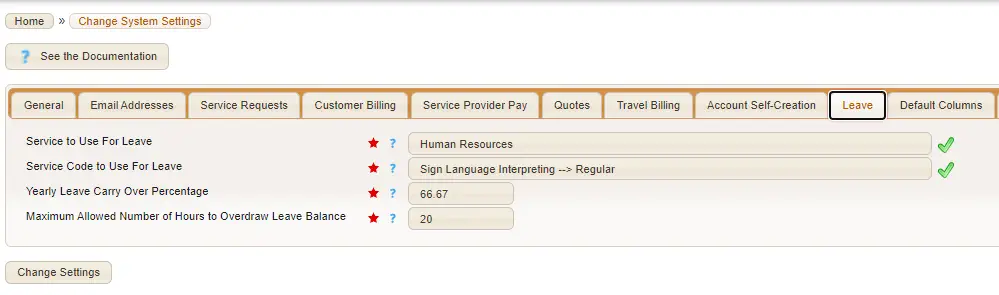
Leave #
#
Service to Use for Leave – This is the service you’d use for leave requests. It’s most often set to Human Resources.
Service Code to use for Leave – This is used to determine which service code you’d like the system to look for a matching rate for to use to pay if a Service Provider is on leave. This is typically a “Staff Pay” service code or the most common service code you have.
Yearly Leave Carry Over Percentage – The maximum amount of leave (as a % of their base yearly leave allocation) that can be carried over into the next calendar year.
Maximum Allowed Hours to Overdraw Leave Balance – The determined amount of hours of overdrawn leave balance that controls when staff with the Billing role are sent an alert about the overdrawn leave.

Example: Jaime took 24 hours of leave this year, but the maximum allowed number of hours to overdraw is 20. As soon as Jaime has gone over 20 hours, the billing department will get an alert.
Default Columns for Assignment View #
We only have one setting in this tab! But it is a very important one!
Default Columns For Assignment View – Here you can choose and sort what default columns you want to display for the Assignment view (REQUESTS>ASSIGNMENTS).

Note: Users can override these default columns and choose their own by editing their user interface preferences (YOUR ACCOUNT > YOUR USER INTERFACE PREFERENCES).
LDAP #
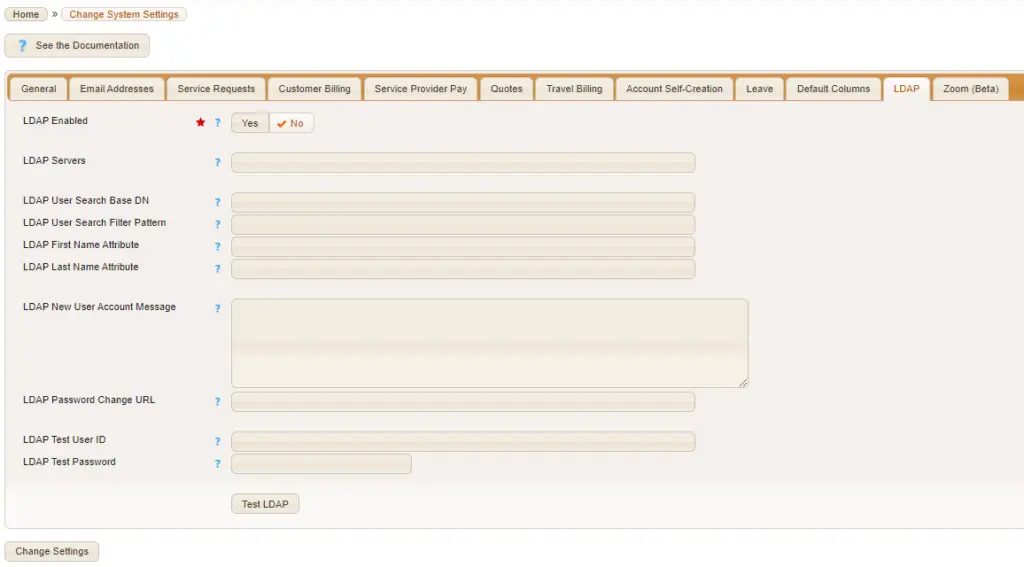
Also known as Lovely Delicious Apple Pie…..(I wish).
LDAP actually stands for “Lightweight Directory Access Protocol”. In Usked, the LDAP feature is a type of SSO (Same Sign-On – not to be confused with Single Sign-On) that allows you to use the same sign-in credentials from your directory server to log into Usked.
Because LDAP is a bit involved, we’ve created an entirely separate article on it! Go take a look and LDAP’t it for your organization. (Adapt…LDAP’t….I’ll see myself out now).
ZOOM #
#
The last tab in your system settings!
Like LDAP, the integration of Zoom is a bit more involved than just what is listed in these settings. Take a look at these articles for more information on how Usked and Zoom can work together!